0%

해싱 (Hashing)

  • 해싱(Hashing)은 키 값에 직접 산술적인 연산을 적용하여 항목이 저장되어 있는 테이블의 주소를 계산하여 항목에 접근하는 자료구조. 해시 테이블(Hash Table) 은 키 값의 연산에 의한 직접 접근이 가능한 구조로 해시 테이블(Hash Table)을 이용한 탐색을 해싱(Hashin) 이라고 한다.
  • 어떤항목의 탐색 키만을 가지고 바로 항목이 저장되어 있는 배열의 인덱스를 결정하는 기법.

추상자료형

  • 새로운 항목을 사입(add)
  • 탐색 키에 관련된 항목을 삭제(delete)
  • 탐색 키에 관련된 값을 탐색(search)
  • 객체 : 일련의 (key, value) 쌍의 집합
  • 연산
    • add(key, value) : (key, value)를 사전에 추가
    • delete(key) : key에 해당되는 (key, value)를 찾아서 삭제하고 관련된 value는 반환한다. 탐색에 실패하면 null을 반환
    • search(key) : key에 해당되는 value를 찾아서 반환. 만약 탐색이 실패하면 null을 반환

해싱의 구조

해싱은 자료를 저장하는데 배열을 사용한다. 원하는 항목이 저장된 위치를 알고 있다면 빠르게 삽입하거나 꺼낼 수 있다.

  • 해시함수(Hash Function) : 탐색 키를 입력받아 해시 주소(Hash Address) 를 생성하고 해시 주소가 배열로 구현된 해시 테이블(Hash Table) 의 인덱스가 된다.
  • 해시 테이블 K를 받아서 해시 함수 h()로 연산한 결과인 해시 주소 h(k)를 인덱스로 사용하여 해시 테이블에 있는 항목에 접근한다.
  • 해시테이블 ht는 M개의 버켓(bucket) 으로 이루어지는 테이블로써 ht[0], ht[1]… ht[M-1]의 원소를 가진다.
  • 버켓은 s개의 슬롯(slot) 을 가질 수 있으며, 하나의 슬롯에는 하나의 항목이 저장된다. 하나의 버켓에 여러 개의 슬롯을 두는 이유는 서로 다른 두 개의 키가 해시 함수에 의해 동일한 주소로 변환될 수 있으므로 여러 개의 항목을 동일한 버켓에 저장하기 위해서이지만, 대부분의 경우 하나의 버켓에 하나의 슬롯을 가진다.

  • 해시테이블에 존재하는 버켓의 수가 M이므로 해시 함수 h()는 모든 k에 대해 $0 \le h(k) \le M-1$ 의 범위 값을 제공해야한다. 대부분의 경우 해시 테이블의 버켓 수는 키가 가질 수 있는 모든 경우의 수보다 매우 작으므로 여러 개의 서로 다른 탐색 키가 해시 함수에 의해 같은 해시 구조로 사상(Mapping)되는 경우가 자주 발생한다.

  • 서로다른 두 개의 탐색 키 K1와 K2에 대하여 h(k1) = h(k2)인 경우를 충돌(Collision) 이라고 한며, 이러한 키 k1, k2를 동의어(synonym) 라 한다.

  • 만약 충돌이 발생하면 같은 버켓에 있는 다른 슬롯에 항목을 저장하게 된다.

  • 충돌이 자주 일어나면 버켓 내부에서 순차탐색 시간이 길어져 탐색 성능이 저하될 수 있으므로 해시 함수를 수정하거나 해시 테이블의 크기를 적절하게 조절해야한다.

  • 충돌이 버켓에 할당된 슬롯 수보다 많이 발생하게 되면 버켓에 더 이상 항목을 저장할 수 없게 되는 오버플로(overflow)가 발생한다. 만약 버켓당 슬롯의 수가 하나(s==1)이면 충돌이 곧 오버플로를 의미한다.

  • 오버플로가 발생하면 더 이상 항목을 저장할 수 없으므로 오버플로를 해결하기 위한 방법이 반드시 필요.
Lamda Expressions(람다식)

람다식은 Anonymous Founction(익명 함수)를 생성하기 위한 식으로 함수지향 언어이다.

장점

  • 자바 코드가 간결해진다.
  • 컬렉션의 요소를 필터링하거나 매핑해서 원하는 결과를 쉽게 집계할 수 있다.

람다식의 형태

람다식의 형태는 매개변수를 가진 코드블록이지만 런타임 시에는 익명 구현 객체를 생성한다.

람다식 -> 매개변수를 가진 코드 블록 -> 익명 구현 객체

기존 Runnable의 인터페이스 익명 구현 객체 생성 방법

1
2
3
4
5
Runnable runnable = new Runnable() {
public void run() {
//...
}
}

람다식을 이용한 Runnable의 인터페이스 익명 구현 객체 생성 방법

1
2
3
Runnable runnable = () -> {
//...
}

람다식은 (매개변수)->{실행코드} 형태로 작성할 수 있다.

기본문법

(매개변수, ...) -> {실행문; ...};

  • 매개변수의 이름은 자유롭게 정의할 수 있으면 ->는 매개변수룰 이용하여 {...} 를 실행한다는 의미가 된다.

    (int a) -> { System.out.prinltn(a); }

  • 개개변수 타입은 런타임 시 대입되는 값에 따라서 자동으로 인식될 수 있으므로 타입을 언급할 필요는 없다.

    (a) -> { System.out.println(a); }

  • 하나의 매개변수만 있다면 ()를 생략할 수 있으며, 하나의 실행문만 있다면 {}도 생략 가능하다.

    a -> System.out.println(a) OR (a) -> System.out.println(a)

  • 매개변수가 없을 경우 ()-> {실행문}형식으로 사용한다.

  • 중괄호 {}를 실행하고 결과를 리턴해야한다면 return문으로 결과 값을 지정할 수 있다.
    (x, y) -> { return x + y }

  • 중괄호 {}에 return 문만 있다면, return문 없이 리턴 할 수 있다.
    (x, y) -> x + y

Generic(제네릭)

Generic(제네릭)은 class와 interface, method를 정의할 때 Type(타입)Parameter(파라미터)로 사용할 수 있도록 하는 역할을 한다.
그래서 타입 파라미터는 코드를 작성할 때 구체적일 타입으로 대체되어 다양한 코드를 생성할 수 있도록 한다.

장점

  1. 컴파일 시 정확한 타입 체크를 할 수 있다.
    • 컴파일러에서 코드에서 잘못 사용한 타입 때문에 에러가 발생하는 상황을 예방할 수 있다.
  2. Casting(형변환)을 사용하지 않는다.

    • Casting을 사용하면 불필요한 타입 변환을 하므로 성능에 영향을 줄 수 있다.

      형변환을 이용한 경우

      1
      2
      3
      List list = new ArrayList();
      list.add("work");
      String data = (String) list.get(0); //casting을 해야함

      Generic(제네릭)을 이용한 경우

      1
      2
      3
      List<String> list = new ArrayList<>();
      list.add("work");
      String data = list.get(0); //generic을 사용하면 casting을 안함

Generic(제네릭) 종류

Generic Type(제네릭 타입) (class<T>, interface<T>)

제네릭 타입은 타입을 파라미터로 가지는 클래스와 인터페이스를 말하고, class, interface 뒤에 <> 붙이고 사이에 Type Parameter를 넣는다.

1
2
3
4
5
6
public class clasName<T> {
...
}
public interface InterfaceName<T> {
...
}

Example(에제)

Generic Class

1
2
3
4
5
6
7
8
9
10
class Box<T> {
private T t;
public void add(T t) {
this.t = t;
}

public T get() {
return this.t;
}
}

Test

1
2
3
4
5
6
7
public class Main {
public static void main(String[] args) {
Box<String> box = new Box<>();
box.add("Flower");
System.out.println("Box name : "+ box.get());
}
}

Multi Type Parameter(멀티 타입 파라미터) (class<K,V,...>, interface<K,V,...>)

Generic Type은 두 개 이상 Multi Type Parameter를 사용할 수 있다.

1
2
3
public class ClassName<K, V> {

}

Example(예제)

  • Multi Type Generic Class
1
2
3
4
5
6
7
8
9
10
11
12
13
14
15
16
17
18
19
20
21
22
23
24
25
class Product<K, M> {
private K kind;
private M model;

public Product() {
}

public Product(K kind, M model) {
this.kind = kind;
this.model = model;
}

public K getKind() {
return kind;
}

public M getModel() {
return model;
}

public void add(K kind, M model) {
this.kind = kind;
this.model = model;
}
}

Test

1
2
3
4
5
6
7
public class Main {
public static void main(String[] args) {
Product<String, String> p1 = new Product();
p1.add("Tool", "망치");
System.out.println("kind=" + p1.getKind() + ", model=" + p1.getModel());
}
}

Generic Method(제네릭 메소드) (<T, R> R method(<T t>))

Generic Method는 Type Parameter(타입 파라미터)와 Return Type(리턴타입)으로 타입 파라미터를 갖는 메소드 이다.

표현방법

1
2
3
public <TypeParameter, ...> returnType methodName(Parameter, ...) {
...
}

Example(예제)

제네릭 클래스

1
2
3
4
5
6
7
8
9
10
class Box<T> {
private T t;
public void add(T t) {
this.t = t;
}

public T get() {
return this.t;
}
}

제네릭 메소드

1
2
3
4
5
public static <T> Box<T> boxing(T t) {
Box<T> box = new Box<>();
box.set(t);
return box;
}

Test

1
2
3
4
5
6
7
8
9
10
11
12
public class Main {
public static void main(String[] args) {
Box<Integer> box = boxing(10);
System.out.println("Box=" + box.get());
}

public static <T> Box<T> boxing(T t) {
Box<T> box = new Box<>();
box.set(t);
return box;
}
}

Limited Type Parameter(제한된 파라미터)) (T extends superType)

Limited Type Parameter는 상위 타입이거나 상위 타입을 상속받고 있는 하위 타입만 사용하겠다라는 것이다.

상위 타입은 클래스 뿐만 아니라 인터페이스도 사용가능하다.

public <T extends superType> returnType method(args, ...) { ...}

Example(예제)

Limited Type Parameter

1
2
3
4
5
public <T extends Number> int compare(T t1, T t2) {
long v1 = t1.longValue();
long v2 = t2.longValue();
return Long.compare(v1, v2);
}

Test

1
2
3
4
5
6
7
8
9
10
11
12
public class Main {
public static void main(String[] args) {
System.out.println("compare=" + compare(10,20));
System.out.println("compare=" + compare(20,20));
}

public static <T extends Number> int compare(T t1, T t2) {
long v1 = t1.longValue();
long v2 = t2.longValue();
return Long.compare(v1, v2);
}
}

Wildcard Type(와일드카드 타입) (<?>, <? extends ...), <? super ...>

?를 Wildcard(와일드 카드) 라고 부른다.

  1. GenericType<?> : Unbounded Wildcards(제한없음)

    • 모든 클래스, 인터페이스 타입이 올수 있다.
  2. GenericType<? extends SuperType> : Upper Bounded Wildcards(상위클래스 제한)

    • 상위 타입이나 하위 타입만 올 수 있다.
  3. GenericType<? super ChildType> : Lower Bounded Wildcards(하위 클래스 제한)

    • 하위타입이나 나 상위 타입만 올 수 있다.

Example(예제)

일반인, 직장인, 학생, 고등학생 클래스

  1. 일반인(Person)은 최상위 부모객체이다.

  2. 직장(worker)은 일반인(Person)을 상속 받는다.

  3. 학생(Student)는 일반인(Person)을 상속 받는다.

  4. 고등학생(HighStudent)은 학생(Student)를 상속 받는다.

1
2
3
4
5
6
7
8
9
10
11
12
13
14
15
16
17
18
19
20
21
22
23
24
25
26
27
28
29
class Person {
private String course;

public Person(String course) {
this.course = course;
}

@Override
public String toString() {
return course;
}
}
class Worker extends Person {

public Worker(String course) {
super(course);
}
}

class Student extends Person {
public Student(String course) {
super(course);
}
}
class HighStudent extends Student {
public HighStudent(String course) {
super(course);
}
}

코스 클래스

  • 수강생을 배정하는 클래스
1
2
3
4
5
6
7
8
9
10
11
12
13
14
15
16
17
18
19
20
21
22
23
24
25
26
27
28
class Course<T> {
private String name;
private List<T> students;

public Course() {
}

public Course(String name) {
this.name = name;
this.students = new ArrayList<>();
}

public String getName() {
return name;
}

public void setName(String name) {
this.name = name;
}

public List<T> getStudents() {
return students;
}

public void add(T t) {
students.add(t);
}
}

Test

  1. Course<?> : 모든 타입(Person, Worker, Student, HighStudent)를 받을 수 있다.
  2. Course<? extends Student> : 학생(Student), 고등학생(HighStudent)만 받을 수 있다.
  3. Course<? super Worker> : 직장인(Worker) 일반인(Person)만 받을 수 있다.
1
2
3
4
5
6
7
8
9
10
11
12
13
14
15
16
17
18
19
20
21
22
23
24
25
26
27
28
29
30
31
32
33
34
35
36
37
38
39
40
41
42
43
44
45
46
public static void main(String[] args) {
Course<Person> personCourse = new Course<>("일반인 과정");
personCourse.add(new Person("일반인"));
personCourse.add(new Worker("직장인"));
personCourse.add(new Student("학생"));
personCourse.add(new HighStudent("고등학생"));

Course<Worker> workerCourse = new Course<>("직장인 과정");
workerCourse.add(new Worker("직장인"));
Course<Student> studentCourse = new Course<>("학생 과정");
studentCourse.add(new Student("학생"));
studentCourse.add(new HighStudent("고등학"));

Course<HighStudent> highStudentCourse = new Course<>("고등학생과정");
highStudentCourse.add(new HighStudent("고등학생"));

//모든과정
registerCourse(personCourse);
registerCourse(workerCourse);
registerCourse(studentCourse);
registerCourse(highStudentCourse);

//학생
// registerCourseStudent(personCourse); //학생만가능
// registerCourseStudent(workerCourse); //학생만가능
registerCourseStudent(studentCourse);
registerCourseStudent(highStudentCourse);
//직장인
registerCourseWorker(personCourse);
registerCourseWorker(workerCourse);
// registerCourseWorker(studentCourse); //직장인 일반인만가능
// registerCourseWorker(highStudentCourse); //직장인 일반인만가능
}

public static void registerCourse(Course<?> course) {
System.out.println(course.getName() + " 수강생 : " + course.getStudents());
}

public static void registerCourseStudent(Course<? extends Student> course) {
System.out.println(course.getName() + " 학생 수강생 : " + course.getStudents());
}
public static void registerCourseWorker(Course<? super Worker> course) {
System.out.println(course.getName() + " 직장인 수강생 : " + course.getStudents());
}

}

Generic inheritance and implementation(제네릭 상속과 구현)

제네릭 타입도 다른타입과 마찬가지로 부모 클래스가 될 수 있다.

부모 클래스

public class Parent<K, V> { ... }

자식 클래스

public class Child<K, V, C> extends Product<K, V> { ... }

Example(예제)

부모 클래스

1
2
3
4
5
6
7
8
9
10
11
12
13
14
15
16
17
18
19
20
21
22
23
24
25
26
27
28
class Product<K, M> {
private K kind;
private M model;

public Product() {
}

public Product(K kind, M model) {
this.kind = kind;
this.model = model;
}

public K getKind() {
return kind;
}

public void setKind(K kind) {
this.kind = kind;
}

public M getModel() {
return model;
}

public void setModel(M model) {
this.model = model;
}
}

자식 클래스

1
2
3
4
5
6
7
8
9
10
11
12
13
14
15
16
17
18
class ChildProduct<K, M, C extends Product<K, M>> {
private C company;

public ChildProduct() {
}

public ChildProduct(C company) {
this.company = company;
}

public C getCompany() {
return company;
}

public void setCompany(C company) {
this.company = company;
}
}

Test

1
2
3
4
5
6
7
8
9
10
11
12
13
14
15
16
17
18
19
20
21
22
23
24
25
26
27
28
29
30
31
32
33
34
35
36
37
38
39
40
41
42
43
44
45
46
47
48
49
50
51
52
53
54
55
56
57
58
59
60
61
62
public class Main {
public static void main(String[] args) {
ChildProduct<String, String, String> smProduct = new ChildProduct<>();
smProduct.setKind("TV");
smProduct.setCompany("삼성전자");
smProduct.setModel("OLED1234");
ChildProduct<String, String, String> lgProduct = new ChildProduct<>();
lgProduct.setKind("TV");
lgProduct.setCompany("LG전자");
lgProduct.setModel("OLED5678");
System.out.println("Product[Company=" + smProduct.getCompany() + ", kind=" + smProduct.getKind() + ", Model=" + smProduct.getModel() + "]");
System.out.println("Product[Company=" + lgProduct.getCompany() + ", kind=" + lgProduct.getKind() + ", Model=" + lgProduct.getModel() + "]");
}
}

class ChildProduct<K, M, C extends Product<K, M>> {
private C company;

public ChildProduct() {
}

public ChildProduct(C company) {
this.company = company;
}

public C getCompany() {
return company;
}

public void setCompany(C company) {
this.company = company;
}
}

class Product<K, M> {
private K kind;
private M model;

public Product() {
}

public Product(K kind, M model) {
this.kind = kind;
this.model = model;
}

public K getKind() {
return kind;
}

public void setKind(K kind) {
this.kind = kind;
}

public M getModel() {
return model;
}

public void setModel(M model) {
this.model = model;
}
}

나이트의 이동

문제

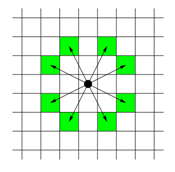
체스판 위에 한 나이트가 놓여져 있다. 나이트가 한 번에 이동할 수 있는 칸은 아래 그림에 나와있다. 나이트가 이동하려고 하는 칸이 주어진다. 나이트는 몇 번 움직이면 이 칸으로 이동할 수 있을까?

입력

입력의 첫째 줄에는 테스트 케이스의 개수가 주어진다.

각 테스트 케이스는 세 줄로 이루어져 있다. 첫째 줄에는 체스판의 한 변의 길이 l(4 ≤ l ≤ 300)이 주어진다. 체스판의 크기는 l × l이다. 체스판의 각 칸은 두 수의 쌍 {0, …, l-1} × {0, …, l-1}로 나타낼 수 있다. 둘째 줄과 셋째 줄에는 나이트가 현재 있는 칸, 나이트가 이동하려고 하는 칸이 주어진다.

출력

각 테스트 케이스마다 나이트가 몇 번만에 이동할 수 있는지 출력한다.

예제 입력 1

1
2
3
4
5
6
7
8
9
10
3
8
0 0
7 0
100
0 0
30 50
10
1 1
1 1

예제 출력 1

1
2
3
5
28
0

풀이

8칸 이동할 수 있는 나이트의 이동범위를 설정해주고 BFS 를 이용하여 문제를 해결할 수 있다.

1
private static int[][] PATH = {{1,2}, {2,1}, {-1,2}, {-2,1}, {1,-2}, {2,-1}, {-1,-2}, {-2,-1}};

BFS 코드

1
2
3
4
5
6
7
8
9
10
11
12
13
14
15
16
17
public static void bfs(Queue<Edge> queue, int l) {
while (!queue.isEmpty()) {
Edge e = queue.poll();
int x = e.x;
int y = e.y;
for (int k = 0 ; k < 8; k ++) {
int nx = x + PATH[k][0];
int ny = y + PATH[k][1];
if (nx >= 0 && nx < l && ny >=0 && ny < l) {
if (depth[nx][ny] == -1) {
depth[nx][ny] = depth[x][y] + 1;
queue.add(new Edge(nx, ny));
}
}
}
}
}

소스코드

1
2
3
4
5
6
7
8
9
10
11
12
13
14
15
16
17
18
19
20
21
22
23
24
25
26
27
28
29
30
31
32
33
34
35
36
37
38
39
40
41
42
43
44
45
46
47
48
49
50
51
52
53
54
55
56
57
58
59
60
61
62
import java.util.Arrays;
import java.util.LinkedList;
import java.util.Queue;
import java.util.Scanner;

/**
* 7562 : 나이트의 이동
*/
public class Main {
private static int[][] PATH = {{1,2}, {2,1}, {-1,2}, {-2,1}, {1,-2}, {2,-1}, {-1,-2}, {-2,-1}};
private static int[][] depth;
static class Edge {
int x;
int y;
Edge (int x, int y) {
this.x = x;
this.y = y;
}
}
public static void main(String[] args) {
Scanner scan = new Scanner(System.in);
int t = scan.nextInt();

while (t-- != 0) {
int l = scan.nextInt();
depth = new int[l][l];

int sx = scan.nextInt();
int sy = scan.nextInt();
int dx = scan.nextInt();
int dy = scan.nextInt();

for (int i = 0; i < l; i++) {
Arrays.fill(depth[i], -1);
}

Queue<Edge> queue = new LinkedList<>();
queue.offer(new Edge(sx,sy));
depth[sx][sy] = 0; //시작
bfs(queue, l);
System.out.println(depth[dx][dy]);
}
}

public static void bfs(Queue<Edge> queue, int l) {
while (!queue.isEmpty()) {
Edge e = queue.poll();
int x = e.x;
int y = e.y;
for (int k = 0 ; k < 8; k ++) {
int nx = x + PATH[k][0];
int ny = y + PATH[k][1];
if (nx >= 0 && nx < l && ny >=0 && ny < l) {
if (depth[nx][ny] == -1) {
depth[nx][ny] = depth[x][y] + 1;
queue.add(new Edge(nx, ny));
}
}
}
}
}
}

토마토

문제

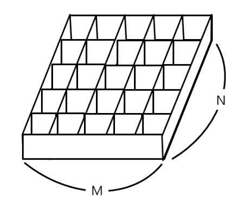
철수의 토마토 농장에서는 토마토를 보관하는 큰 창고를 가지고 있다. 토마토는 아래의 그림과 같이 격자 모양 상자의 칸에 하나씩 넣어서 창고에 보관한다.

창고에 보관되는 토마토들 중에는 잘 익은 것도 있지만, 아직 익지 않은 토마토들도 있을 수 있다. 보관 후 하루가 지나면, 익은 토마토들의 인접한 곳에 있는 익지 않은 토마토들은 익은 토마토의 영향을 받아 익게 된다. 하나의 토마토의 인접한 곳은 왼쪽, 오른쪽, 앞, 뒤 네 방향에 있는 토마토를 의미한다. 대각선 방향에 있는 토마토들에게는 영향을 주지 못하며, 토마토가 혼자 저절로 익는 경우는 없다고 가정한다. 철수는 창고에 보관된 토마토들이 며칠이 지나면 다 익게 되는지, 그 최소 일수를 알고 싶어 한다.

토마토를 창고에 보관하는 격자모양의 상자들의 크기와 익은 토마토들과 익지 않은 토마토들의 정보가 주어졌을 때, 며칠이 지나면 토마토들이 모두 익는지, 그 최소 일수를 구하는 프로그램을 작성하라. 단, 상자의 일부 칸에는 토마토가 들어있지 않을 수도 있다.

입력

첫 줄에는 상자의 크기를 나타내는 두 정수 M,N이 주어진다. M은 상자의 가로 칸의 수, N은 상자의 세로 칸의 수를 나타낸다. 단, 2 ≤ M,N ≤ 1,000 이다. 둘째 줄부터는 하나의 상자에 저장된 토마토들의 정보가 주어진다. 즉, 둘째 줄부터 N개의 줄에는 상자에 담긴 토마토의 정보가 주어진다. 하나의 줄에는 상자 가로줄에 들어있는 토마토의 상태가 M개의 정수로 주어진다. 정수 1은 익은 토마토, 정수 0은 익지 않은 토마토, 정수 -1은 토마토가 들어있지 않은 칸을 나타낸다.

출력

여러분은 토마토가 모두 익을 때까지의 최소 날짜를 출력해야 한다. 만약, 저장될 때부터 모든 토마토가 익어있는 상태이면 0을 출력해야 하고, 토마토가 모두 익지는 못하는 상황이면 -1을 출력해야 한다.

예제 입력 1

1
2
3
4
5
6 4
0 0 0 0 0 0
0 0 0 0 0 0
0 0 0 0 0 0
0 0 0 0 0 1

예제 출력 1

1
8

예제 입력 2

1
2
3
4
5
6 4
0 -1 0 0 0 0
-1 0 0 0 0 0
0 0 0 0 0 0
0 0 0 0 0 1

예제 출력 2

1
-1

예제 입력 3

1
2
3
4
5
6 4
1 -1 0 0 0 0
0 -1 0 0 0 0
0 0 0 0 -1 0
0 0 0 0 -1 1

예제 출력 3

1
6

예제 입력 4

1
2
3
4
5
6
5 5
-1 1 0 0 0
0 -1 -1 -1 0
0 -1 -1 -1 0
0 -1 -1 -1 0
0 0 0 0 0

예제 출력 4

1
14

예제 입력 5

1
2
3
2 2
1 -1
-1 1

예제 출력 5

1
0

풀이

BFS를 이용하여 문제를 해결할 수 있다.

소스코드

1
2
3
4
5
6
7
8
9
10
11
12
13
14
15
16
17
18
19
20
21
22
23
24
25
26
27
28
29
30
31
32
33
34
35
36
37
38
39
40
41
42
43
44
45
46
47
48
49
50
51
52
53
54
55
56
57
58
59
60
61
62
63
64
65
66
67
68
69
70
71
72
73
74
75
76
77
78
79
80
81
import java.io.BufferedReader;
import java.io.InputStreamReader;
import java.util.LinkedList;
import java.util.Queue;

/**
* 7576 : 토마토
*/
public class Main {
public static final int[][] PATH = {{0, 1}, {0, -1}, {1, 0}, {-1, 0}};
public static int[][] table;
public static int[][] dist;

public static class Edge {
int x;
int y;

public Edge(int x, int y) {
this.x = x;
this.y = y;
}
}

public static void main(String[] args) throws Exception {
BufferedReader in = new BufferedReader(new InputStreamReader(System.in));
String[] MNLine = in.readLine().split(" ");
int m = Integer.parseInt(MNLine[0]);
int n = Integer.parseInt(MNLine[1]);
table = new int[n][m];
dist = new int[n][m];

Queue<Edge> queue = new LinkedList<>();
for (int i = 0; i < n; i++) {
String[] split = in.readLine().split(" ");
for (int j = 0; j < m; j++) {
int v = Integer.parseInt(split[j]);
table[i][j] = v;
dist[i][j] = -1;
if (v == 1) {
dist[i][j] = 0;
queue.offer(new Edge(i, j));
}
}
}
in.close();

bfs(queue, n, m);

int result = -1;
for (int i = 0; i < n; i++) {
for (int j = 0; j < m; j++) {
if (result < dist[i][j]) {
result = dist[i][j];
}
if (table[i][j] == 0 && dist[i][j] == -1) {
System.out.println("-1");
return;
}
}
}
System.out.println(result);
}

public static void bfs(Queue<Edge> queue, int n, int m) {
while (!queue.isEmpty()) {
Edge e = queue.poll();
int x = e.x;
int y = e.y;
for (int k = 0; k < 4; k++) {
int nx = x + PATH[k][0];
int ny = y + PATH[k][1];
if (0 <= nx && nx < n && 0 <= ny && ny < m) {
if (table[nx][ny] != -1 && dist[nx][ny] == -1) {
dist[nx][ny] = dist[x][y] + 1;
queue.offer(new Edge(nx, ny));
}
}
}
}
}
}

미로탐색

문제

N×M크기의 배열로 표현되는 미로가 있다.

1
2
3
4
1	0	1	1	1	1
1 0 1 0 1 0
1 0 1 0 1 1
1 1 1 0 1 1

미로에서 1은 이동할 수 있는 칸을 나타내고, 0은 이동할 수 없는 칸을 나타낸다. 이러한 미로가 주어졌을 때, (1, 1)에서 출발하여 (N, M)의 위치로 이동할 때 지나야 하는 최소의 칸 수를 구하는 프로그램을 작성하시오. 한 칸에서 다른 칸으로 이동할 때, 서로 인접한 칸으로만 이동할 수 있다.

위의 예에서는 15칸을 지나야 (N, M)의 위치로 이동할 수 있다. 칸을 셀 때에는 시작 위치와 도착 위치도 포함한다.

입력

첫째 줄에 두 정수 N, M(2 ≤ N, M ≤ 100)이 주어진다. 다음 N개의 줄에는 M개의 정수로 미로가 주어진다. 각각의 수들은 붙어서 입력으로 주어진다.

출력

첫째 줄에 지나야 하는 최소의 칸 수를 출력한다. 항상 도착위치로 이동할 수 있는 경우만 입력으로 주어진다.

예제 입력 1

1
2
3
4
5
4 6
101111
101010
101011
111011

예제 출력 1

1
15

예제 입력 2

1
2
3
4
5
4 6
110110
110110
111111
111101

예제 출력 2

1
9

예제 입력 3
1
2
3
2 25
1011101110111011101110111
1110111011101110111011101

예제 출력 3
1
38

예제 입력 4
1
2
3
4
5
6
7
8
7 7
1011111
1110001
1000001
1000001
1000001
1000001
1111111

예제 출력 4
1
13

풀이

(1, 1)에서 출발하여 (N, M)의 위치로 이동할 때 지나야 하는 최소의 칸 수룰 구하는 문제

최소의 칸수를 이용하려면 최소 범위를 구해야하는데 DFS로는 최소 범위를 구할 수 없으므로 BFS를 이용하여 문제를 푼다.

위치 이동은 상하 좌우로 이동하므로

1
final static int[][] PATH = {{0,1}, {0,-1}, {1,0}, {-1, 0}};

를 세팅 해준다.

그리고 범위 탐색을해야하므로 dist[][] 를 추가하여 방문범위를 추가한다.

아래 처럼 미로가있다면

1
2
3
4
5
4 6
101111
101010
101011
111011

dist로 방문 범위를 찍어주면 아래와 같은 결과를 얻을 수 있다.

1
2
3
4
1  0  9 10 11 12 
2 0 8 0 12 0
3 0 7 0 13 14
4 5 6 0 14 15

그러면 (N, M)의 위치값을 구하는 것으로 dist[n-1][m-1]의 값을 출력해준다.

DFS 코드

1
2
3
4
5
6
7
8
9
10
11
12
13
14
15
16
17
18
19
20
21
public static void bfs(int n, int m) {
Queue<Edge> queue = new LinkedList<>();
queue.offer(new Edge(0, 0));
dist[0][0] = 1;

while (!queue.isEmpty()) {
Edge e = queue.poll();
int x = e.x;
int y = e.y;
for (int k = 0; k < 4; k++) {
int nx = x + PATH[k][0];
int ny = y + PATH[k][1];
if (0 <= nx && n > nx && 0 <= ny && m > ny) {
if (table[nx][ny] == 1 && dist[nx][ny] == 0) {
queue.offer(new Edge(nx, ny));
dist[nx][ny] = dist[x][y] + 1;
}
}
}
}
}

소스코드

1
2
3
4
5
6
7
8
9
10
11
12
13
14
15
16
17
18
19
20
21
22
23
24
25
26
27
28
29
30
31
32
33
34
35
36
37
38
39
40
41
42
43
44
45
46
47
48
49
50
51
52
53
54
55
56
57
58
59
60
61
62
63
import java.io.BufferedReader;
import java.io.InputStreamReader;
import java.util.LinkedList;
import java.util.Queue;

/**
* 2178 : 미로탐색
*/
public class Main {
private static int[][] table;
private static int[][] dist;
final static int[][] PATH = {{0,1}, {0,-1}, {1,0}, {-1, 0}};
public static class Edge {
int x;
int y;

Edge(int x, int y) {
this.x = x;
this.y = y;
}
}

public static void main(String[] args) throws Exception {
BufferedReader in = new BufferedReader(new InputStreamReader(System.in));
String[] splitnm = in.readLine().split(" ");
int n = Integer.parseInt(splitnm[0]);
int m = Integer.parseInt(splitnm[1]);

table = new int[n][m];
dist = new int[n][m];
for (int i = 0; i < n; i++) {
String[] splitLine = in.readLine().split("");
for (int j = 0; j < splitLine.length; j++) {
table[i][j] = Integer.parseInt(splitLine[j]);
}
}
bfs(n, m);
System.out.println(dist[n - 1][m - 1]);
in.close();
}

public static void bfs(int n, int m) {
Queue<Edge> queue = new LinkedList<>();
queue.offer(new Edge(0, 0));
dist[0][0] = 1;

while (!queue.isEmpty()) {
Edge e = queue.poll();
int x = e.x;
int y = e.y;
for (int k = 0; k < 4; k++) {
int nx = x + PATH[k][0];
int ny = y + PATH[k][1];
if (0 <= nx && n > nx && 0 <= ny && m > ny) {
if (table[nx][ny] == 1 && dist[nx][ny] == 0) {
queue.offer(new Edge(nx, ny));
dist[nx][ny] = dist[x][y] + 1;
}
}
}
}
}
}

문제

<그림 1>과 같이 정사각형 모양의 지도가 있다. 1은 집이 있는 곳을, 0은 집이 없는 곳을 나타낸다. 철수는 이 지도를 가지고 연결된 집들의 모임인 단지를 정의하고, 단지에 번호를 붙이려 한다. 여기서 연결되었다는 것은 어떤 집이 좌우, 혹은 아래위로 다른 집이 있는 경우를 말한다. 대각선상에 집이 있는 경우는 연결된 것이 아니다. <그림 2>는 <그림 1>을 단지별로 번호를 붙인 것이다. 지도를 입력하여 단지수를 출력하고, 각 단지에 속하는 집의 수를 오름차순으로 정렬하여 출력하는 프로그램을 작성하시오.

입력

첫 번째 줄에는 지도의 크기 N(정사각형이므로 가로와 세로의 크기는 같으며 5≤N≤25)이 입력되고, 그 다음 N줄에는 각각 N개의 자료(0혹은 1)가 입력된다.

출력

첫 번째 줄에는 총 단지수를 출력하시오. 그리고 각 단지내 집의 수를 오름차순으로 정렬하여 한 줄에 하나씩 출력하시오.

예제 입력 1

1
2
3
4
5
6
7
8
7
0110100
0110101
1110101
0000111
0100000
0111110
0111000

예제 출력 1

1
2
3
4
3
7
8
9

소스코드

1
2
3
4
5
6
7
8
9
10
11
12
13
14
15
16
17
18
19
20
21
22
23
24
25
26
27
28
29
30
31
32
33
34
35
36
37
38
39
40
41
42
43
44
45
46
47
48
49
50
51
52
53
54
55
56
57
58
59
60
61
62
63
64
65
66
67
68
69
70
71
72
73
74
75
76
77
78
79
80
81
82
83
84
85
86
87
88
89
90
91
92
93
94
95
96
97
import java.io.BufferedReader;
import java.io.InputStreamReader;
import java.util.ArrayList;
import java.util.LinkedList;
import java.util.List;
import java.util.Queue;

/**
* 2667 : 단지번호 붙이기
*/
public class PasteOfNumberingMain {
static int[][] table;
static int[][] dist;
static int ret = 0;
static int[][] path = {{0, 1}, {0, -1}, {1, 0}, {-1, 0}};

public static void main(String[] args) throws Exception {
BufferedReader in = new BufferedReader(new InputStreamReader(System.in));
int n = Integer.parseInt(in.readLine());
table = new int[n][n];
dist = new int[n][n];

for (int i = 0; i < n; i++) {
String[] splitLine = in.readLine().split("");
for (int j = 0; j < splitLine.length; j++) {
table[i][j] = Integer.parseInt(splitLine[j]);
}
}
int cnt = 0;
List<Integer> list = new ArrayList<>();
for (int i = 0; i < n; i++) {
for (int j = 0; j < n; j++) {
if (table[i][j] == 1 && dist[i][j] == 0) {
ret = 0;
bfs(i, j, n, ++cnt);
list.add(ret);
}
}
}
list.sort(Integer::compareTo);
StringBuilder sb = new StringBuilder();
sb.append(cnt);
sb.append("\n");
list.sort(Integer::compareTo);
for (Integer i : list) {
sb.append(i);
sb.append("\n");
}
System.out.println(sb.toString());
in.close();
}

static class Edge {
int x;
int y;

public Edge(int x, int y) {
this.x = x;
this.y = y;
}
}
public static void bfs(int i , int j, int n ,int cnt) {
Queue<Edge> queue = new LinkedList<>();
dist[i][j] = cnt;
ret++;
queue.offer(new Edge(i, j));

while (!queue.isEmpty()) {
Edge e = queue.poll();
for (int k = 0; k < 4; k++) {
int nx = e.x + path[k][0];
int ny = e.y + path[k][1];
if (0 <= nx && nx < n && 0 <= ny && ny < n) {
if (table[nx][ny] == 1 && dist[nx][ny] == 0) {
dist[nx][ny] = cnt;
ret++;
queue.offer(new Edge(nx,ny));
}
}
}
}

}
public static void dfs(int i, int j, int n, int cnt) {
dist[i][j] = cnt;
ret++;
for (int k = 0; k < 4; k++) {
int nx = i + path[k][0];
int ny = j + path[k][1];
if (0 <= nx && nx < n && 0 <= ny && ny < n) {
if (table[nx][ny] == 1 && dist[nx][ny] == 0) {
dfs(nx, ny ,n, cnt);
}
}
}
}
}

이분그래프

문제

그래프의 정점의 집합을 둘로 분할하여, 각 집합에 속한 정점끼리는 서로 인접하지 않도록 분할할 수 있을 때, 그러한 그래프를 특별히 이분 그래프 (Bipartite Graph) 라 부른다.

그래프가 입력으로 주어졌을 때, 이 그래프가 이분 그래프인지 아닌지 판별하는 프로그램을 작성하시오.

입력

입력은 여러 개의 테스트 케이스로 구성되어 있는데, 첫째 줄에 테스트 케이스의 개수 K(2≤K≤5)가 주어진다. 각 테스트 케이스의 첫째 줄에는 그래프의 정점의 개수 V(1≤V≤20,000)와 간선의 개수 E(1≤E≤200,000)가 빈 칸을 사이에 두고 순서대로 주어진다. 각 정점에는 1부터 V까지 차례로 번호가 붙어 있다. 이어서 둘째 줄부터 E개의 줄에 걸쳐 간선에 대한 정보가 주어지는데, 각 줄에 인접한 두 정점의 번호가 빈 칸을 사이에 두고 주어진다.

출력

K개의 줄에 걸쳐 입력으로 주어진 그래프가 이분 그래프이면 YES, 아니면 NO를 순서대로 출력한다.

예제 입력 1

1
2
3
4
5
6
7
8
9
2
3 2
1 3
2 3
4 4
1 2
2 3
3 4
4 2

예제 출력 1 복사

1
2
YES
NO

풀이

일단 이분 그래프가 뭔지 알아야한다..

https://ko.wikipedia.org/wiki/%EC%9D%B4%EB%B6%84_%EA%B7%B8%EB%9E%98%ED%94%84

그다음 DFS or BFS 를 이용하면 된다.

소스코드

1
2
3
4
5
6
7
8
9
10
11
12
13
14
15
16
17
18
19
20
21
22
23
24
25
26
27
28
29
30
31
32
33
34
35
36
37
38
39
40
41
42
43
44
45
46
47
48
49
50
51
52
53
54
55
56
57
58
59
60
61
62
63
64
65
66
67
68
69
70
71
72
73
74
75
76
77
78
79
80
81
82
83
84
85
86
87
88
89
90
91
92
93
import java.util.*;

/**
* 1707 이분그래프(Bipartite Graph)
*/
public class BipartiteGraphMain {
private static List<List<Integer>> adjList;
private static int[] colors;
private static boolean isBipartite;

public static void main(String[] args) {
Scanner scan = new Scanner(System.in);
int t = scan.nextInt();

while (t-- != 0) {
int v = scan.nextInt(); //vertex
int e = scan.nextInt(); //edge

//init
adjList = new ArrayList<>();
colors = new int[v + 1]; //이분그래프를 분리할 테이블
isBipartite = true;

for (int i = 0 ; i <= v; i ++) {
adjList.add(new ArrayList<>());
colors[i] = 0;
}

//무방향 그래프 값 삽입
for (int i = 0; i < e; i++) {
int from = scan.nextInt();
int to = scan.nextInt();
adjList.get(from).add(to);
adjList.get(to).add(from);
}


//모든 정점의 길이만큼 수행.
for (int i = 1; i <= v; i++) {
if (!isBipartite) { // 이분그래프가 아니면 더 이상 루프를 돌 필요가 없으므로 Break
break;
}
if (colors[i] == 0) {
bfs(i, 1); //RED 1, GREEN -1 형식으로 분리
}
}
System.out.println(isBipartite ? "YES":"NO");
}
}

/**
* DFS
**/
public static void dfs(int v, int color) {
colors[v] = color;
for (Integer vertex : adjList.get(v)) {
//시작정점과 인접 정점의 색이 같으면 이분 그래프가 아니므로 리턴
if (colors[vertex] == color) {
isBipartite = false;
return;
}
//해당 정점을 방문하지 않았으면
if (colors[vertex] == 0) {
dfs(vertex, -color);
}
}
}
/**
* BFS
**/
public static void bfs(int v, int color) {
Queue<Integer> queue = new LinkedList<>();
colors[v] = color;
queue.offer(v);
int tmpColor = color;
while (!queue.isEmpty()) {
int dequeue = queue.poll();
color = colors[dequeue] == 1 ? -1 : 1; //RED 1, GREEN -1 형식으로 분리;
for (Integer vertex : adjList.get(dequeue)) {
//시작정점과 인접 정점의 색이 같으면 이분 그래프가 아니므로 리턴
if (colors[vertex] != 0 && colors[vertex] == colors[dequeue]) {
isBipartite = false;
return;
}
//해당 정점을 방문하지 않았을 경우
if (colors[vertex] == 0) {
colors[vertex] = color;
queue.offer(vertex);
}
}
}
}
}

연결요소의 개수

문제

방향 없는 그래프가 주어졌을 때, 연결 요소 (Connected Component)의 개수를 구하는 프로그램을 작성하시오.

입력

첫째 줄에 정점의 개수 N과 간선의 개수 M이 주어진다. (1 ≤ N ≤ 1,000, 0 ≤ M ≤ N×(N-1)/2) 둘째 줄부터 M개의 줄에 간선의 양 끝점 u와 v가 주어진다. (1 ≤ u, v ≤ N, u ≠ v) 같은 간선은 한 번만 주어진다.

출력

첫째 줄에 연결 요소의 개수를 출력한다.

예제 입력 1

1
2
3
4
5
6
6 5
1 2
2 5
5 1
3 4
4 6

예제 출력 1

1
2

예제 입력 2

1
2
3
4
5
6
7
8
9
6 8
1 2
2 5
5 1
3 4
4 6
5 4
2 4
2 3

예제 출력 2

1
1

풀이

모든 정점의 개수만큼 루프를 돌면서

연결된 하나의 그래프의 개수를 카운팅

소스코드

1
2
3
4
5
6
7
8
9
10
11
12
13
14
15
16
17
18
19
20
21
22
23
24
25
26
27
28
29
30
31
32
33
34
35
36
37
38
39
40
41
42
43
44
45
46
47
48
49
50
51
52
53
54
55
56
57
58
59
60
61
62
63
64
65
66
67
68
69
70
71
72
73
74
import java.util.*;

/**
* 11724 연결요소
*/
public class ConnectedComponentMain {
public static void main(String[] args) {
Scanner scan = new Scanner(System.in);
int n = scan.nextInt(); //정점의 개수
int m = scan.nextInt(); //간선의 개수

List<List<Integer>> adjList = new ArrayList<>();

for (int i = 0; i <= n; i++) {
adjList.add(new ArrayList<>());
}

for (int i = 0; i < m; i++) {
int u = scan.nextInt();
int v = scan.nextInt();
adjList.get(u).add(v);
adjList.get(v).add(u);
}

boolean[] check = new boolean[n+1];
int cnt = 0;
for (int i = 1 ; i <= n; i ++) {
if(!check[i]) {
bfs(adjList, check, i);
cnt++;
}
}
System.out.println(cnt);
}

/**
* DFS
* @param adjList
* @param check
* @param v
*/
public static void dfs(List<List<Integer>> adjList, boolean[] check, int v) {
if (check[v]) {
return;
}
check[v] = true;
for (Integer vertex : adjList.get(v)) {
if (!check[vertex]) {
dfs(adjList, check, vertex);
}
}
}

/**
* BFS
* @param adjList
* @param check
* @param v
*/
public static void bfs(List<List<Integer>> adjList, boolean[] check, int v) {
Queue<Integer> queue = new LinkedList<>();
check[v] = true;
queue.offer(v);
while (!queue.isEmpty()) {
int dequeue = queue.poll();
for (int vertex : adjList.get(dequeue)) {
if (!check[vertex]) {
check[vertex] = true;
queue.offer(vertex);
}
}
}
}
}

DFS와 BFS

문제

그래프를 DFS로 탐색한 결과와 BFS로 탐색한 결과를 출력하는 프로그램을 작성하시오. 단, 방문할 수 있는 정점이 여러 개인 경우에는 정점 번호가 작은 것을 먼저 방문하고, 더 이상 방문할 수 있는 점이 없는 경우 종료한다. 정점 번호는 1번부터 N번까지이다.

입력

첫째 줄에 정점의 개수 N(1 ≤ N ≤ 1,000), 간선의 개수 M(1 ≤ M ≤ 10,000), 탐색을 시작할 정점의 번호 V가 주어진다. 다음 M개의 줄에는 간선이 연결하는 두 정점의 번호가 주어진다. 어떤 두 정점 사이에 여러 개의 간선이 있을 수 있다. 입력으로 주어지는 간선은 양방향이다.

출력

첫째 줄에 DFS를 수행한 결과를, 그 다음 줄에는 BFS를 수행한 결과를 출력한다. V부터 방문된 점을 순서대로 출력하면 된다.

예제 입력 1

1
2
3
4
5
6
4 5 1
1 2
1 3
1 4
2 4
3 4

예제 출력 1

1
2
1 2 4 3
1 2 3 4

예제 입력 2

1
2
3
4
5
6
5 5 3
5 4
5 2
1 2
3 4
3 1

예제 출력 2

1
2
3 1 2 5 4
3 1 4 2 5

예제 입력 3

1
2
1000 1 1000
999 1000

예제 출력 3

1
2
1000 999
1000 999

소스코드

1
2
3
4
5
6
7
8
9
10
11
12
13
14
15
16
17
18
19
20
21
22
23
24
25
26
27
28
29
30
31
32
33
34
35
36
37
38
39
40
41
42
43
44
45
46
47
48
49
50
51
52
53
54
55
56
57
58
59
60
61
62
63
64
65
66
67
68
69
70
71
72
73
74
75
76
77
78
79
80
81
82
83
import java.util.*;

/**
* 1260 : DFS와 BFS
*/
public class DFSAndBFSMain {
public static void main(String[] args) {
Scanner scan = new Scanner(System.in);
int n = scan.nextInt(); //정점의 개수
int m = scan.nextInt(); //간선의 개수
int v = scan.nextInt(); //탐색을 시작할 정점의 번호

//인접 리스트로 저장
List<List<Integer>> adjList = new ArrayList<>();

for (int i = 0; i <= n; i++) {
adjList.add(new LinkedList<>());
}

for (int i = 0; i < m; i++) {
int from = scan.nextInt();
int to = scan.nextInt();
adjList.get(from).add(to);
adjList.get(to).add(from);
}

Stack<Integer> stack = new Stack<>();
Queue<Integer> queue = new LinkedList<>();
dfs(adjList, stack, v);
System.out.println();
bfs(adjList, queue, v);
System.out.println();
}

/**
* 깊이 우선 탐색 DFS
* @param adjList
* @param stack
* @param v
*/
public static void dfs(List<List<Integer>> adjList, Stack<Integer> stack, int v) {
//방문했다고 표시
stack.push(v);
System.out.print(v);
adjList.get(v).sort(Integer::compareTo);
for (Integer vertex : adjList.get(v)) {
if (!stack.isEmpty() && stack.search(vertex) == -1) {
System.out.print(" ");
dfs(adjList, stack, vertex);
}
}
}

/**
* 너비 우선 탐색 BFS
* @param adjList
* @param queue
* @param v
*/
public static void bfs(List<List<Integer>> adjList, Queue<Integer> queue, int v) {
boolean[] check = new boolean[adjList.size()+1];
//1. 방문했음을 표시
check[v] = true;
System.out.print(v);
//2. queue 에 정점 v삽입
queue.offer(v);
while (!queue.isEmpty()) {
//4. queue에서 정점 v 삭제
int vertex = queue.poll();
//5. 인접 정점 탐색
for (Integer ver : adjList.get(vertex)) {
//6. 탐색하지 않았다면
if (!check[ver]) {
//방문했다고 ququq에 삽입
queue.offer(ver);
check[ver] = true;
System.out.print(" ");
System.out.print(ver);
}
}
}
}
}