목차
Kafka QuickStart
아래 화면과
kafka_2.12-2.2.0명령은 2019년 Kafka 2.2의 ZooKeeper 기반 실습 기록이다. Kafka 4.x에서는 ZooKeeper 모드가 제거됐다. 지금 시작한다면 글 마지막의 KRaft 절차와 Apache 공식 Quickstart를 사용한다.
Step 1: 카프카 다운로드
$ tar -xzf kafka_2.12-2.2.0.tgz
$ cd kafka_2.12-2.2.0
user@ubuntu-vm-01:~/Documents/kafka_2.12$ ls
bin  config  libs  LICENSE  logs  NOTICE  site-docs
아파치 카프카를 다운로드 받는다. (버전 2.12-2.2.0) Download
다운을 다 받으면 압축을 풀고 폴더로 가면 아래와 같이 파일 목록들을 볼 수 있다.(폴더명은 kafka_2.12-2.2.0에서 kafka_2.12로 변경함)
$ tar -xzf kafka_2.12-2.2.0.tgz
$ cd kafka_2.12-2.2.0
pscheol@ubuntu-vm-01:~/Documents/kafka_2.12$ ls
bin config libs LICENSE logs NOTICE site-docs- bin 폴더에는 실행파일들이 담겨있다.
user@ubuntu-vm-01:~/Documents/kafka_2.12$ cd bin
user@ubuntu-vm-01:~/Documents/kafka_2.12/bin$ ls
connect-distributed.sh               kafka-reassign-partitions.sh
connect-standalone.sh                kafka-replica-verification.sh
kafka-acls.sh                        kafka-run-class.sh
kafka-broker-api-versions.sh         kafka-server-start.sh
kafka-configs.sh                     kafka-server-stop.sh
kafka-console-consumer.sh            kafka-streams-application-reset.sh
kafka-console-producer.sh            kafka-topics.sh
kafka-consumer-groups.sh             kafka-verifiable-consumer.sh
kafka-consumer-perf-test.sh          kafka-verifiable-producer.sh
kafka-delegation-tokens.sh           trogdor.sh
kafka-delete-records.sh              windows
kafka-dump-log.sh                    zookeeper-security-migration.sh
kafka-log-dirs.sh                    zookeeper-server-start.sh
kafka-mirror-maker.sh                zookeeper-server-stop.sh
kafka-preferred-replica-election.sh  zookeeper-shell.sh
kafka-producer-perf-test.sh
pscheol@ubuntu-vm-01:~/Documents/kafka_2.12$ cd bin
pscheol@ubuntu-vm-01:~/Documents/kafka_2.12/bin$ ls
connect-distributed.sh kafka-reassign-partitions.sh
connect-standalone.sh kafka-replica-verification.sh
kafka-acls.sh kafka-run-class.sh
kafka-broker-api-versions.sh kafka-server-start.sh
kafka-configs.sh kafka-server-stop.sh
kafka-console-consumer.sh kafka-streams-application-reset.sh
kafka-console-producer.sh kafka-topics.sh
kafka-consumer-groups.sh kafka-verifiable-consumer.sh
kafka-consumer-perf-test.sh kafka-verifiable-producer.sh
kafka-delegation-tokens.sh trogdor.sh
kafka-delete-records.sh windows
kafka-dump-log.sh zookeeper-security-migration.sh
kafka-log-dirs.sh zookeeper-server-start.sh
kafka-mirror-maker.sh zookeeper-server-stop.sh
kafka-preferred-replica-election.sh zookeeper-shell.sh
kafka-producer-perf-test.sh
- config에는 각종 환경변수 설정들이 담겨있다.
user@ubuntu-vm-01:~/Documents/kafka_2.12$ cd config
user@ubuntu-vm-01:~/Documents/kafka_2.12/config$ ls
connect-console-sink.properties    consumer.properties
connect-console-source.properties  log4j.properties
connect-distributed.properties     producer.properties
connect-file-sink.properties       server.properties
connect-file-source.properties     tools-log4j.properties
connect-log4j.properties           trogdor.conf
connect-standalone.properties      zookeeper.properties
pscheol@ubuntu-vm-01:~/Documents/kafka_2.12$ cd config
pscheol@ubuntu-vm-01:~/Documents/kafka_2.12/config$ ls
connect-console-sink.properties consumer.properties
connect-console-source.properties log4j.properties
connect-distributed.properties producer.properties
connect-file-sink.properties server.properties
connect-file-source.properties tools-log4j.properties
connect-log4j.properties trogdor.conf
connect-standalone.properties zookeeper.properties
나머지 폴더들은 생략.
Step 2: Start the server
- 카프카는 ZooKeeper를 사용하므로 만약 Zookeeper 서버가 없다면 먼저 서버를 시작해야 한다.
$ cd kafka_2.12/bin

$ ./zookeeper-server-start.sh ../config/zookeeper.properties
ZooKeeper 서버 시작 (카프카 폴더 안에 zookeeper-server-start.sh가 있다.)
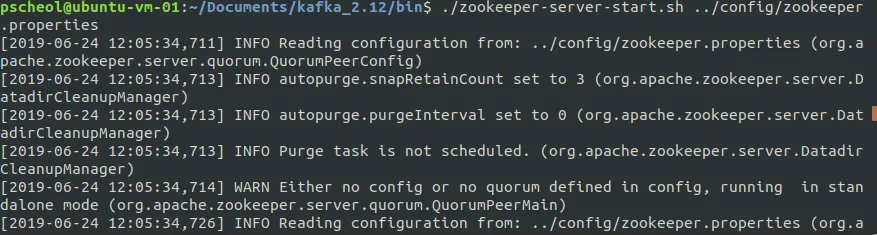
[zookeeper 서버 실행]
 $ cd kafka_2.12/bin

 $ ./kafka-server-start.sh ../config/server.properties
zookeeper 서버 실행
kafka 서버 시작
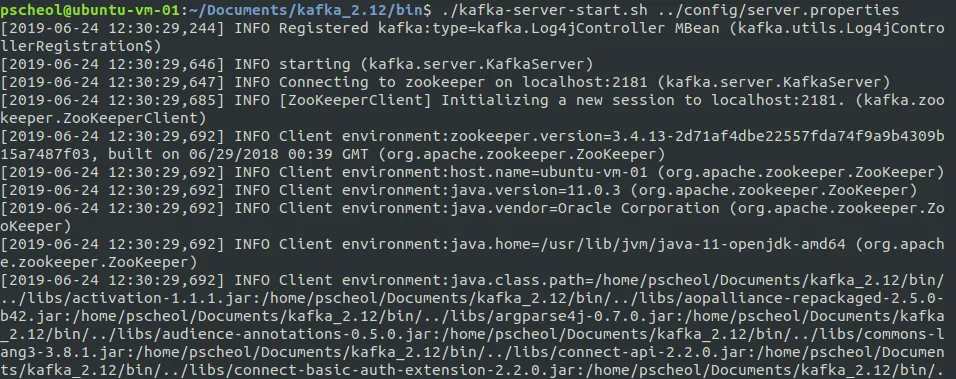
[kafka 서버 실행]
kafka 서버 실행
Step 3: Create a topic
-
‘test’라는 topic이름으로 싱글 파티션과 하나의 복사본을 생성한다.
-
$ ./kafka-topics.sh --create --bootstrap-server localhost:9092 --replication-factor 1 --partitions 1 --topic test -
’test’라는 topic이름으로 싱글 파티션과 하나의 복사본을 생성한다.
$ ./kafka-topics.sh --create --bootstrap-server localhost:9092 --replication-factor 1 --partitions 1 --topic test- test라는 topic이 생성되었는지 확인
$ ./kafka-topics.sh --list --bootstrap-server localhost:9092
[topic ‘test’ 생성]
topic ‘test’ 생성
topic을 수동으로 생성할 수 있거나, 존재하지 않는 topic이 게시될 때 topic을 자동으로 생성주는 broker들을 구성할 수 있다.
Step 4: 메시지 전송
- kafka는 클라이언트에서 파일입력 또는 표준 입력을 받아 kafka클러스터에 메시지를 보낸다. 기본적으로 각줄의 분리된 메시지를 보낸다.
$ ./kafka-console-producer.sh --broker-list localhost:9092 --topic test
hello world
hello message
Step 5: consumer 시작
- kafka command line consumer 에 표준 출력으로 덤프한다.
$ ./kafka-console-consumer.sh --bootstrap-server localhost:9092 --topic test --from-beginning
hello world
hello message
- producer 명령을 수행하면 kafka 클러스터에 메시지를 보내고 consumer에서 받을 수 있다.
6. import/export 기능 사용하기
- Kafka는 콘솔에 입력하는 것 뿐만아니라, import/export 기능을 제공한다.
## step1 : 먼저 echo 명령어 test.txt파일을 만들어낸다
$ echo -e "foo/\nbar" > test.txt

## step 2: 아래 명령어를 수행
$ bin/connect-standalone.sh config/connect-standalone.properties config/connect-file-source.properties config/connect-file-sink.properties
그러면 kafka 폴더 에 파일명.sink.txt라는 파일이 만들어진다. 그 파일을 실행해보면 아래와 같이 출력된다.
$ more test.sink.txt
foo
bar
또한 저장된 test파일을 kafka consumer console에서 실행하여 볼 수 있다.
bin/kafka-console-consumer.sh --bootstrap-server localhost:9092 --topic connect-test --from-beginning
참조 : https://kafka.apache.org/quickstart
참조 : https://kafka.apache.org/quickstart
현재 Kafka에서 처음부터 다시 실행하기
Kafka 4.x의 공식 빠른 시작은 Java 17 이상과 KRaft를 기준으로 한다. 최신 릴리스의 압축 파일을 Apache 다운로드 페이지에서 받아 풀고, 그 압축 파일 디렉터리에서 다음 순서로 진행한다. 아래 config/server.properties는 실습용 단일 서버 구성이다. 기존 클러스터의 로그 디렉터리를 다시 format하면 데이터를 잃을 수 있으므로 새 실습 환경에서만 실행한다.
java -version
KAFKA_CLUSTER_ID="$(bin/kafka-storage.sh random-uuid)"
bin/kafka-storage.sh format --standalone -t "$KAFKA_CLUSTER_ID" -c config/server.properties
bin/kafka-server-start.sh config/server.properties
마지막 명령은 서버가 실행되는 동안 터미널을 점유한다. 다른 터미널에서 토픽을 만들고 결과를 확인한다. Kafka 4.3.1 문서 기준 압축 파일 이름은 kafka_2.13-4.3.1.tgz이지만, 설치한 릴리스가 다르면 경로도 달라진다. 운영 시스템의 기존 저장 경로를 문서 명령으로 덮어쓰지 않는다.
bin/kafka-topics.sh --create --topic quickstart-events --bootstrap-server localhost:9092
bin/kafka-topics.sh --describe --topic quickstart-events --bootstrap-server localhost:9092
bin/kafka-console-producer.sh --topic quickstart-events --bootstrap-server localhost:9092
프로듀서 프롬프트에서 hello world와 hello kafka를 한 줄씩 입력한다. 한 줄이 한 레코드가 된다. 또 다른 터미널에서 다음을 실행하면 처음부터 저장된 레코드를 읽는다.
bin/kafka-console-consumer.sh --topic quickstart-events \
  --from-beginning --bootstrap-server localhost:9092
hello world와 hello kafka가 차례로 보이면 생산자→브로커의 토픽 로그→소비자 경로를 확인한 것이다. --from-beginning은 이 콘솔 소비자가 읽기 시작할 위치에 관한 옵션이며 토픽 데이터를 새로 쓰는 명령이 아니다. 같은 토픽에서 다시 읽을 수 있는 것은 보관 정책 안에서 레코드가 유지되기 때문이다. 독립 소비자 그룹을 만들면 각각 자신의 오프셋을 갖는다.
flowchart LR
  P[콘솔 프로듀서] --> T[토픽 quickstart-events]
  T --> C1[소비자 그룹 A의 오프셋]
  T --> C2[소비자 그룹 B의 오프셋]
| 막힌 단계 | 확인할 내용 |
|---|---|
java -version 실패 | 공식 버전 요구사항과 설치된 JDK |
| format 실패 | 현재 위치의 config/server.properties, 로그 디렉터리 권한 |
| broker 시작 실패 | 9092 포트 중복, 설정 오류, 로그 출력 |
| 토픽 생성 연결 실패 | broker가 완전히 시작됐는지, bootstrap-server 주소 |
| 소비자 출력이 비어 있음 | 프로듀서 입력·토픽 이름, 시작 오프셋, 보관 설정 |
원문의 --broker-list와 ZooKeeper 시작 순서는 당시 버전의 사용법이다. 현재 예제에서는 --bootstrap-server를 사용한다. Kafka Connect의 파일 소스/싱크 실습은 공식 Quickstart에도 있지만 플러그인 경로와 설정 파일이 버전마다 다를 수 있으므로 토픽 생산·소비가 먼저 성공한 다음 해당 버전 안내를 따른다. 단일 브로커·복제 계수 1은 장애에 대한 복원력을 제공하지 않는 학습 구성이다.
같은 카테고리의 글
이어서 읽을 글
[Kafka] Intro. Message System
Messaging System은 하나의 프로그램에서 다른 프로그램으로 데이터를 전달할 수 있도록 돕는 시스템이다.
[Kafka] 1. Apache Kafka 개념 및 소개
Kafka의 프로듀서·브로커·컨슈머 구조와 토픽·파티션·복제를 살펴보고, 컨슈머 그룹이 메시지를 나누어 읽는 방식을 정리한다.

Kafka에 Spark 스트리밍 연결
Kafka 데이터를 Spark Structured Streaming으로 읽는 흐름을 살펴보고, 오프셋·체크포인트·출력 저장소의 복구 역할을 구분한다.
kafka에 Storm 연결하기
KafkaSpout에서 Bolt로 메시지가 전달되는 과정을 따라가며, 커넥터 설정과 오프셋·재처리·중복 처리 문제를 살펴본다.